Block of the month – January
“Wandering Geese”

This month we are going to try some foundation paper piecing! I have named this block Wandering Geese (or as I have started to think of it as – drunken geese), and it is a twist on the more traditional Circle of Geese block. Our pattern has been graciously provided this month by Piece by Number, you will have to go to her site (here) to download the template.
Note: Even if you are familiar with paper piecing I ask that you please read the directions as I have made some modifications. The original template makes a 12” block, so I have made a couple changes to have our block end up the same 12.5” as our other blocks.
If written instructions are hard to follow for this, there are lots of great videos on paper piecing! If you are a member of Craftsy, the 2012 BOM for October features this block and is free to members.
Here are a few others to check out:
Materials
Colored scraps for geese (at least 2.5” x 3”)
Background material (large scraps work well) + 6.5” square
Template from Piece by Number– 2 clockwise and 1 counterclockwise (remember to check the 1” test line on your printouts!)
Directions.
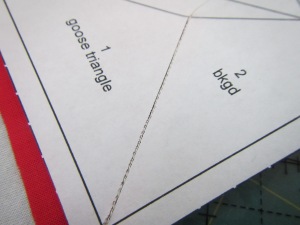
- Print out your templates (2 clockwise and 1 counter clockwise), cut out on the dotted line (insure that your 1” test square is correct!) Note: it can be handy to prefold the lines of the paper or to prestitch the lines with no thread to “perforate” and make removal easier. I find using a slightly smaller stitch setting works fine instead of perforating.

- Take your first template and find a coloured square for your first goose. This piece of fabric needs to cover over the shape of the goose with a minimum of ¼” on each side. To be safe, it is best to have more overage!

- Using a fabric safe glue stick (or a pin) fasten the fabric to the back of the paper so that it covers the shape of the goose labelled 1. Note – your fabric needs to come off the edge of the paper by ½ ” (this is very important!)
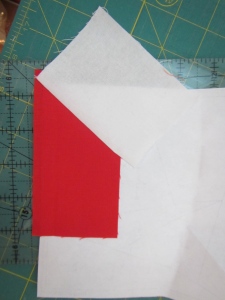
- Fold the paper along the line between the shapes marked 1 and 2. Trim the fabric that you have attached the paper ¼” from the fold.


- Align a piece of background fabric to the edge of the goose fabric, ¼” from the fold, right sides together. Make sure that the background piece will cover the background piece labelled 2.

- Secure the fabric to the piece of paper with a pin and lay the paper flat

- Sew along the black line between spaces 1 and 2.
- IMPORTANT: Extend the sewing along the line to the edge of the paper!! If you do not do this there will be problems later!
- Press the background fabric open.
- Repeat steps 4-8 moving to add fabric to cover the section labelled 3 (so fold along the line that is between 1 and 3).


- Continue moving in order of the numbers around the block. Remember that lines going to the edge of the block need to be continued to the edge of the paper.
- Once the block has been “finished” ie all the pieces are sewen together, you will need to trim. You want to make a 6.5” block so check your measurements. You will need to trim ⅛” past the paper on each side as the paper is only 6.25”.

- Repeat steps 1- 11 for the remaining 2 pieced blocks.
- Remove the paper from the back of the pieced blocks

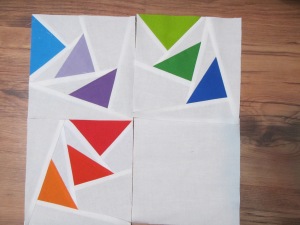
- Assembly the 3 pieced blocks and the 6.5” square block to make a 12.5” block (below is an alternate assembly, have fun with it!).


Next month is a variation of a Dunkard’s path block. As a special present for those of you attending the meeting I will be happy to cut your pieces for you!! If you would like me to cut piecing please bring 8 5″ background squares, 3 5″ of each of 2 colours and 4 5″ squares of a third colour.
